How to Create and Print a USPS Shipping Label?

Printing USPS shipping labels at home is a convenient option that can save both time and money, especially for small businesses that need to manage their shipments efficiently, providing a modern solution to meet various postal needs.
With the ability to print from home or the office, there's no need to wait in line at the post office, saving on transportation and time costs. Let's explore how to create and print a USPS shipping label, along with some FAQs that may come up during the process.
Types of USPS shipping labels
USPS offers a variety of shipping label options to cater to different mailing needs and preferences. The four main types of USPS shipping labels include:
- Priority Mail Labels: This service provides fast delivery, often within 1-3 business days.
- Priority Mail Express Labels: This is the fastest domestic service available through USPS, with overnight delivery to most locations.
- First-Class Mail Labels: Best suited for lightweight packages, it's an affordable option for standard-sized, single-piece envelopes and small packages weighing up to 13 ounces.
- USPS Retail Ground Labels: Suitable for packages that are too heavy for First-Class Mail, which is economical shipping for oversized or non-urgent packages.
Requirements for a USPS Shipping Label
When creating a USPS shipping label, there are specific requirements that must be met to ensure that the package is processed correctly and reaches its destination without any issues. Here are the key requirements:
- Label Format: A standard shipping label should be printed in a legible font with no smudging or fading. It's recommended to use a high-quality printer.
- Paper Quality: Labels should be printed on adhesive-backed labels or plain white paper. If using plain paper, the label should be securely attached to the package with clear shipping tape, ensuring not to tape over the barcode.
- Size: The label should typically fit within the dimensions of 4"x6", which is a common size for shipping label printers.
- Accurate details: The shipping label must include the recipient's full name, street address, city, state, ZIP code, and country (if applicable). In addition, accurate weight and dimensions of the package should be provided when purchasing the label.
- Postage: The label must reflect that the correct postage has been paid. This is usually indicated by a printed-on indication of the service type. Barcodes and tracking numbers are also necessary elements for a shipping label.
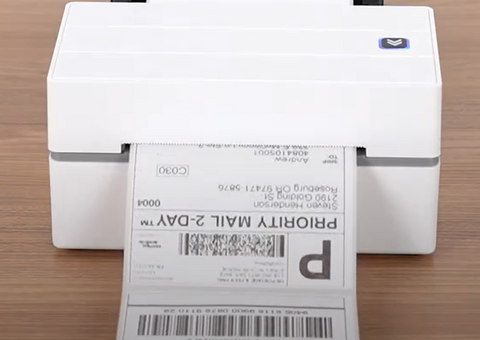
Before creating your own, study a sample shipping label to identify key elements such as the sender's address, recipient's address, and barcode placement.
How Do I Create and Print a Prepaid USPS Shipping Label?
You can create and print a prepaid USPS shipping label online through the USPS website via the Click-N-Ship service. Here are the general steps:
- Set Up an Account
Go to the USPS website and create a free USPS.com account if you don't already have one.

- Start a New Shipment
Navigate to 'Click-N-Ship' from the USPS homepage or search for the Click-N-Ship service. And then, select "Create a Shipment" to start the process.

- Fill out the package details
Input the destination address and return address. Provide package details, including weight, dimensions, and service type (Priority Mail, Priority Mail Express, etc.).
- Click “Add to Cart”
After entering all necessary information for your shipment, review the details to ensure everything is correct. Click the “Add to Cart” button if you’re ready to proceed. This will store the selected shipping label in your shopping cart, allowing you to either continue shopping (adding more labels or services) or proceed to checkout.
- Pay for Postage
Once you've selected your shipping options, you'll be prompted to pay for the postage. Use a credit card, PayPal, or other available payment methods to complete the transaction. The amount paid covers the cost of mailing the package to the recipient.
- Set a schedule for a free Package Pickup
Choose a date for your package pickup, which can typically be scheduled up to one week in advance. Note that pickups usually coincide with your regular mail delivery time.
- Connect to your label printer
If you have access to a shipping label printer within your vicinity, it's possible to link the printer to your computer using either a USB cable or Bluetooth. Once connected, you can effortlessly transfer the file to your device and print out shipping labels swiftly for a professional look to meet your requirements.
In the absence of a printer, consider utilizing the USPS Label Broker service. This option lets you conveniently print your labels at any local Post Office.
- Use a standard shipping label
Ensure the label meets USPS size requirements. The standard size for a domestic shipping label is 4 inches by 6 inches, but labels can be smaller or larger depending on the package and service used.
When using a standard shipping label that doesn't fit the dimensions required by your carrier or packaging, you can employ a label converter tool to resize it appropriately.
- Upload the file and print
After inputting all the required details and purchasing postage, you're ready to print the label. Load your printer with standard paper, select the designed shipping label file, initiate the print command, and begin the printing process.
SEE ASO: What Is a Shipping Label and How to Print It?
FAQS
1. Where can I find Cheap USPS Compatible Shipping Labels?
Third-party logistics companies might offer discounted labels as part of their services. When searching for cheap USPS-compatible shipping labels, ensure that the labels meet USPS size and format requirements, such as being able to accommodate a barcode and address information. Munbyn shipping labels are an excellent option, providing a superior user experience with high-quality adhesives that ensure long-lasting stick-to-package surfaces.
It’s also important to make sure that the labels are compatible with your printer. Always read customer reviews and check the seller's reliability before purchasing to avoid low-quality labels that could cause issues during the shipping process.
2. What sizes are appropriate for USPS postage labels? How to adjust it to the right size?
USPS postage labels are typically 4 inches by 6 inches in size. This is a standard dimension that fits most packages and is widely used for printing shipping labels because it's large enough to accommodate the address, postage, and barcode information.
Many shipping platforms and label printing programs have presets for USPS label sizes. Select the 4x6-inch option or the appropriate template provided by the software. Download the converter from the website to customize your shipping label, and ensure it matches the proper dimensions.
3. What is the most economical method for printing shipping labels?
Printing shipping labels at home can be highly cost-effective, and this service is facilitated by the United States Postal Service via its online platform.
If you need to print a significant number of shipping labels frequently, consider investing in a shipping label printer for your home to meet your basic shipping requirements, preparing for the right size shipping labels to facilitate the label printing process, and saving your time and costs.
Wrap up
In summary, the process of creating and printing a USPS shipping label is a straightforward and user-friendly procedure that offers significant convenience for both businesses and individuals.
Experience the ease of managing your shipments on your schedule. Say goodbye to long lines and hello to a cost-effective way to send mail. Start creating and printing your USPS shipping labels now!


